Agee Software, Inc.
Backup
-
Plan
File Backup is simply copying your data to another drive. This will not copy your applications, settings or boot drive, but it lets you quickly restore individual files. You can use File Explorer or XCopy, that both are part of Windows to copy folders of data. XCopy can run as a scheduled task, making backup automatic. You can also back up to a network drive or upload to the internet.
Tip: If you keep data and your system on different drives, you can back up the data frequently with a scheduled task and back up the system manually less often. The system backup will also be smaller and require less time offline.
System Backup preserves your applications and settings and lets you boot the drive without having to reinstall an operating system from scratch.
Cloning the drive makes an exact copy of the original drive onto another drive of equal or larger size. This can be done with a hardware device that involves removing the drive from your computer or by booting to software that clones the drive to another drive connected to the computer. Hardware devices like Fideco or Kingwin Clone adapter are fast, simple and work reliably on virtually any type of operating system. They require no software to run. Software cloning does not require removing the drive from your PC. This is a much better solution for laptops and tablets.
Image Backup like Macrium Reflect saves your system drive as a single file that you can treat like a data file. You can only store one backup of a cloned drive on a backup drive. You can store many images on the backup drive. You can also restore an image to a smaller drive as long as the data fits on the drive.
- Create Boot Disk. Ventoy is a tool that lets you make a USB bootable. It lets you keep multiple images on a single drive and presents a menu when you boot the Ventoy flash drive. Macrium Reflect, and your Windows ISO image are great images to include on your flash drive. An easy way to download Windows ISO images is to use Rufus. It also creates a bootable Windows install drive that can bypass Microsoft's hardware checks and upgrade old hardware to Windows 11, but is limited to one ISO image. It is also good to have a Live Linux Distribution ISO in your tool kit that doesn't rely on Windows drivers to get to the web. Plan to have access to a laptop or tablet PC away from your network that you can use to continue operating in a power failure or after a fire or theft.
- Prepare
Before a system backup, perform security scans, make sure your data is working, Windows-key, I, Windows Update and Windows-key, R, CleanMgr and click System Cleanup to remove temporary files. Gather the tools you'll need for the backup. (Boot disk for imaging, target disk for image, connecting cables, etc). External USB hard drives are faster than flash drives. A SATA-USB cable lets you use an internal 2.5 inch SATA drive. There are also adapters that use 3.5 inch drives, but they may need additional power. - Boot and Run Imaging Software. While the PC is booting, press the hotkey to see the Boot menu or BIOS menu. If your PC doesn't
show the keys to press while booting, you may need to try using a search engine to find BIOS Boot Key for your PC model.
Here are a few popular models:
Manufacturer: Boot, Bios. Acer: F12, F2. Compaq: Esc/F9, F10. Dell: F12, F2. HP: Esc, F10. Lenovo: F12/F8/F10, F1/F2. Samsung: F12/Esc, F2. Sony: F11, F1/F2/F3. Toshiba: F12, F1/Esc/F12.
Motherboards: ASUS: F8, Del. Gigabyte: F12, Del. MSI: F11, Del. Intel: F10, F2. Asrock: F11, F2/Del. EVGA: F7, Del. Panasonic: F2, F2/Del. EMachines: F12, Tab/Del. Gateway: F11, F2/Del. Sharp: F9, F2.
Tip: You may need to disable Secure Boot in BIOS to boot. You can enable it after backup. BOOT WITH VENTOY:
1. Insert Ventoy flash drive and USB Data Drive with enough free space to hold image
2. Restart computer and press F12 key for Dell ever 1/2 sec until you see Boot Drive Options
3. Choose USB Storage Device (ex: UEFI: USB Disk 3.0 PMAP) and press enter
4. Choose Boot in Normal Mode and press enter
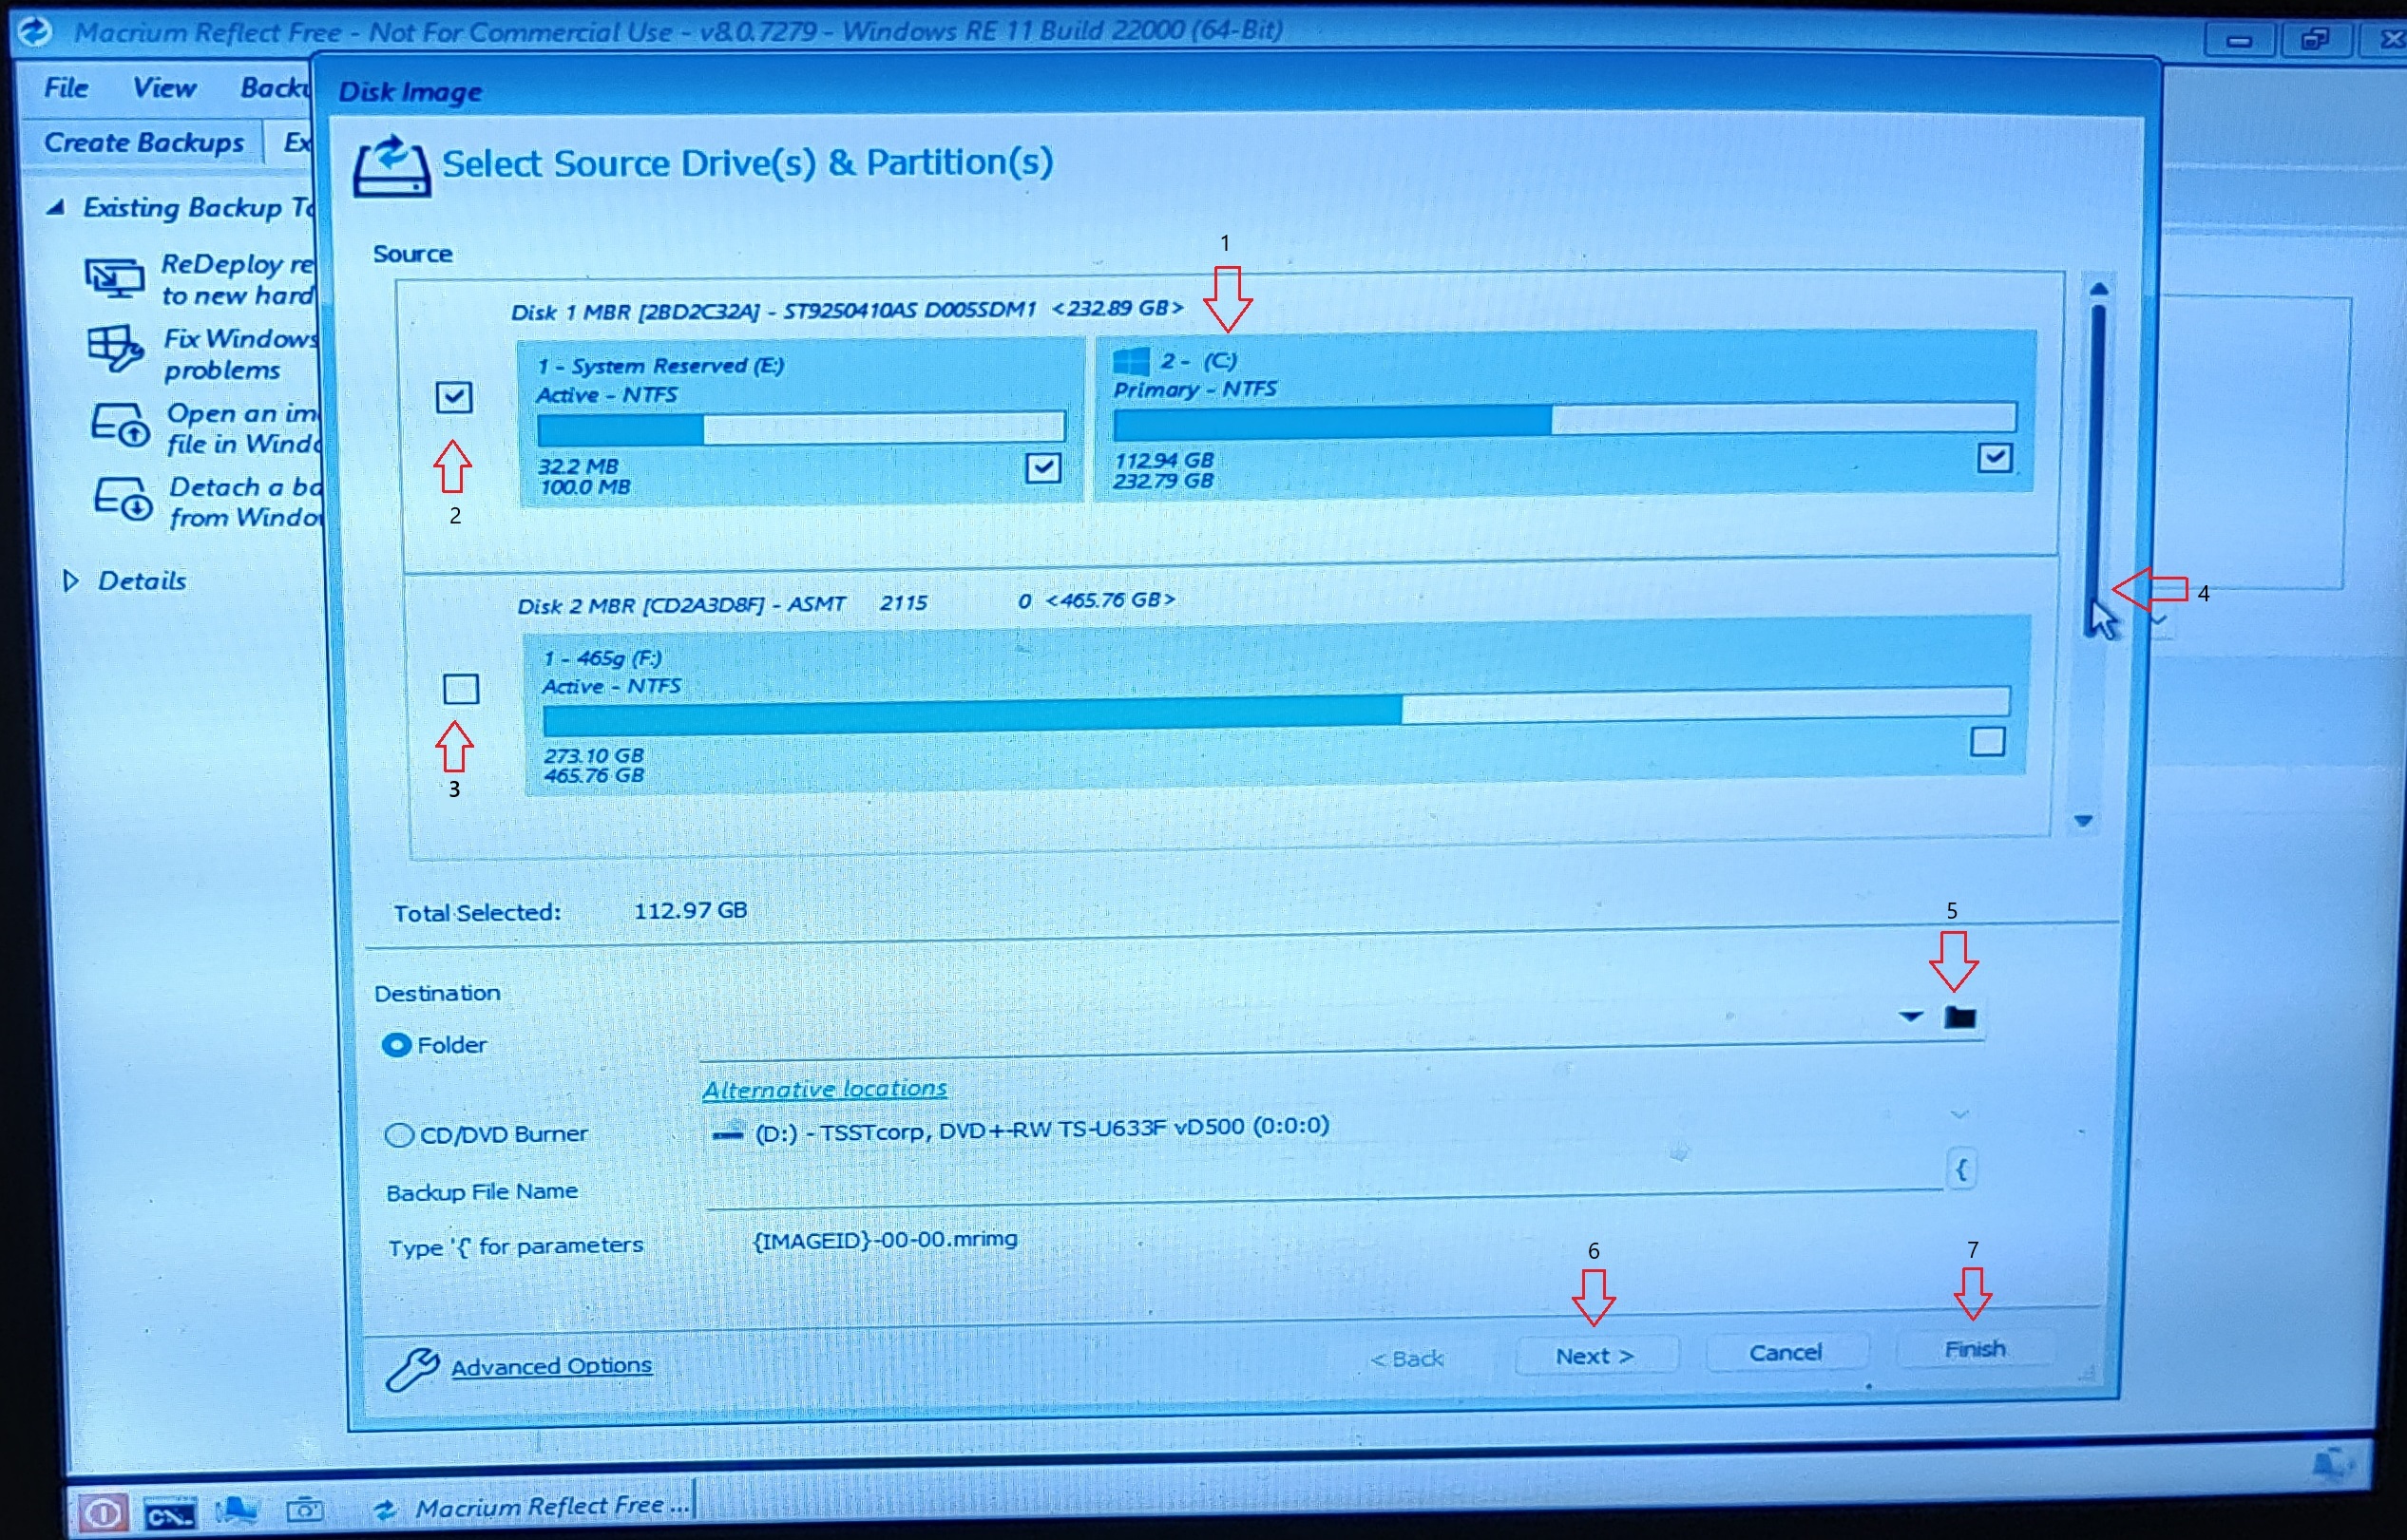
BACK UP WITH MACRIUM REFLECT:
A. Boot with Ventoy and select Macrium Reflect Free 8.0.iso
B. Click Backup tab
C. Select Image Selected Disks
-
1. Find Drive C.
2. Make sure Source box is checked for disk that contains Drive C:.
3. Uncheck all other disks.
4. Scroll down and uncheck all other disks.
5. Browse to drive where backup image will be stored
6. Click Next
7. Click Finish.
Backs up about 3gb/min
RESTORE WITH MACRIUM REFLECT:
1. Boot with Ventoy in Normal Mode and select Macrium Reflect Free 8.0.iso
2. Browse for an Image file...
3. Select the file you want to restore. Click OK
4. Click Restore and verify the target drive under Local Disk.
4. Click Next, Finish
5. Check 'All Target Volume Data Will Be Overwritten'
6. Continue
7. Optional: On Completion: change No Shutdown to Reboot.
-
After Backup
Label the copy with the date and PC. Verify the copied drive boots correctly. Store it and the recovery boot disk in a safe, secure place off site such as a faraday cage in your underground bunker ;).
Advanced Backup
-
To set up a shared folder, you need to know five things from the Server.
- Computer name of the server. Window key R, Cmd to open a Cmd prompt. WHOAMI or ECHO %ComputerName%
- Share name. Open the Cmd prompt. NET SHARE
- UserID to use when mapping drive. Open the Cmd prompt. WHOAMI or ECHO %UserName%
- Password for the UserID. If you don't know the password, you can set it. Right-click on the desktop, New, Shortcut.
Cmd, Next, Finish. Right-click the Cmd prompt, Run As Administrator. If your UserID was owner and you want the password
to be Secrit,
NET USER owner Secrit - Choose a drive letter that is not in use to map the drive. To see what drives are mapped at the Cmd prompt: NET USE
- If the shared folder is on the PC of the person who uses it the most, it will perform better for that person because there is no network delay. Simply put the database in a folder called something like DB, right-click on the folder, select Properties, Sharing, click Advanced Sharing and check Share this folder. Click Permissions and add Users in the Select Users or Groups box. Note the name of the sharing PC (we will refer to it as the 'Server' even though it is not). Click OK. Click Users in the Group or user names box and check Allow by Full Permissions in the Permissions for Users. Click Apply. Click Everyone in the Group or user names box and click Remove. Click OK to close the Share Permissions box, OK to close the Advanced Sharing box and Close on the Properties window.
- For added security, you may want to create a special database user who doesn't have permissions to any folder except the shared DB folder. If you do this, you can give the permissions above to that user instead of Users in the step above.
- Next map a drive letter. On the 'Server', right-click on Computer and select Map Network Drive. Select the drive letter. It should be the same letter for all users, so make sure it is available on the other PCs. Access databases are normally split into two parts, the 'front end' database that contains forms, reports, queries and code, and the 'back end' that contains the shared tables. The Access developer must specify the location of the shared tables in the links of the front end. Using this drive letter is the quickest way to do this. In this example, we will assume we are using drive Z:. In the folder combo, enter \\Server\db where Server is the name of the server you noted above (your PC will probably be named something else). DB is the name of the share you created above. Check Reconnect at logon and Connect using different credentials. Enter the userid and password for the server and check Connect at Logon.
- Complete step 4 for each of the other PCs that will use the database. Drive Z:, Folder: \\Server\db, check both boxes, use the server user's userid and password and check Connect at logon. Test each user's connection to the database. If they get an error, verify they can see the shared files and use Notepad to create a small file to verify they have write access to the shared folder. Verify each connected PC has a shortcut to the database on the desktop and test to make sure the user can log in.
Back Up Your Network
-
Daily backup of a critical file. This helps protect you from errors entered into your database.
This batch file backs up the shared data tables in z:\ContDat.mdb to your local c:\work\bk folder. Paste the file below into Notepad and save it as c:\work\bk.bat. Change ContDat to the name of your database.::Backs up 7 generations of ContDat.mdb in folder z:\work\ to C:\work\bk ::Run daily in Task Scheduler @ECHO OFF C: IF NOT EXIST C:\work\Nul MD \work IF NOT EXIST C:\work\bk\Nul MD \work\bk CD \work\bk DEL ContDat7.mdb REN ContDat6.mdb ContDat7.mdb REN ContDat5.mdb ContDat6.mdb REN ContDat4.mdb ContDat5.mdb REN ContDat3.mdb ContDat4.mdb REN ContDat2.mdb ContDat3.mdb REN ContDat.mdb ContDat2.mdb COPY z:\ContDat.mdb
To schedule the task, open the Task Scheduler (TaskSchd from Cmd prompt).- Click Create Task in Actions
- General tab, Name: Bk
- Triggers tab, New, Daily, (choose a time to start), OK. If you set the time to five minutes into the future, you can test it.
- Actions tab, New, Browse to c:\work\bk.bat, OK.
- Click OK to close the Task Scheduler
-
Weekly Backup. Save this batch as c:\work\BKW.bat and schedule weekly to back up your local
My Documents, Downloads, Favorites, Pictures and external or mapped drives you specify. Add your own
lines to back up other data folders. You can map drives on other PCs if you add your userid and password as
another account to the other PCs and share the C: drive as C. Consider how to back up your email if a copy
of your messages aren't stored on a server off your network. Rotate the external drives the day after your
backup runs. Your goal is to be able to restore your operation without losing more than a week of data using
nothing in your office; only the quarterly backup drives on similar hardware and your weekly backup.
:: BKW.bat backs up drive X: and local user files to E:
:: Run weekly in Task Scheduler
@ECHO OFF
E:
XCOPY x:\*.* \ /d /s /h /i /c /k /y
XCOPY %USERPROFILE% E:\%USERDOMAIN%\%USESRNAME% /d /s /h /i /c /k /y
:Uncomment next 3 lines to copy AnotherPC user settings. Change AnotherPC to the correct name.
::NET USE T: \\AnotherPC\C
::XCOPY T:\Users E:\AnotherPC /d /s /h /i /c /k /y
::NET USE T: /d
- Monthly Archive:
::Bk30.bat backs up .mdb files in c:\work to c:\archive as BKyymm.zip where yy is year and mm is month
::Requires 7-zip be installed. TASKSCHD (Schedule task) to run on Last day of month.
"c:\program files\7-zip\7z" a -stl c:\archive\bk%date:~12,2%%date:~4,2%.zip c:\work\*.mdb
- FTP Off Site Backup:
::Uses WinSCP to log onto ftpsite.com as joe w/password of secrit and send it c:\work\contdat.mdb
@c:
@cd \work
@"c:\program files\winscp\winscp.com" /command "open ftp://joe:secrit!@ftpsite.com" "put contdat.mdb" "exit"
- Recovery tools let you try to recover lost or corrupt data, repair a damaged operating system, gather system info and perform administrative tasks. Hirens Boot CD is an excellent collection to start with. They boot from an ISO image that you can include on your Ventoy flash drive.
NOTE: While backing up, don't forget your personal info.